mybatis自生成-(2)-简单使用与复杂使用

在MBG.xml 配置文件中,有 多种  targetRuntime 可以设置。

<!--

targetRuntime="MyBatis3Simple":生成简单版的CRUD

MyBatis3:豪华版

-->
1、当用simple 方式 生成代码时,可以用下面的代码测试效果。
@Test
public void testMyBatis3Simple() throws IOException{
	SqlSessionFactory sqlSessionFactory = getSqlSessionFactory();
	SqlSession openSession = sqlSessionFactory.openSession();
	try{
		EmployeeMapper mapper = openSession.getMapper(EmployeeMapper.class);
		List<Employee> list = mapper.selectByExample(null);
		for (Employee employee : list) {
			System.out.println(employee.getId());
		}
	}finally{
		openSession.close();
	}
}
2、当用 MyBatis3 方式时,可以用下面代码测试:
@Test
public void testMyBatis3() throws IOException{
	SqlSessionFactory sqlSessionFactory = getSqlSessionFactory();
	SqlSession openSession = sqlSessionFactory.openSession();
	try{
		EmployeeMapper mapper = openSession.getMapper(EmployeeMapper.class);
		//xxxExample就是封装查询条件的
		//1、查询所有
		//List<Employee> emps = mapper.selectByExample(null);
		//2、查询员工名字中有e字母的,和员工性别是1的
		//封装员工查询条件的example
		EmployeeExample example = new EmployeeExample();
		//创建一个Criteria,这个Criteria就是拼装查询条件
		//select id, last_name, email, gender, d_id from tbl_employee 
		//WHERE ( last_name like ? and gender = ? ) or email like "%e%"
		Criteria criteria = example.createCriteria();
		criteria.andLastNameLike("%e%");
		criteria.andGenderEqualTo("1");
			
		Criteria criteria2 = example.createCriteria();
		criteria2.andEmailLike("%e%");
		example.or(criteria2);
			
		List<Employee> list = mapper.selectByExample(example);
		for (Employee employee : list) {
			System.out.println(employee.getId());
		}
			
	}finally{
		openSession.close();
	}
}


mybatis自生成-(1)-配置MBG

一、MyBatis Generator (MBG) 简介

Mybatis Generator是MyBatis和ibatis的代码生成器。主要生成如下:
(1)与表结构匹配的Java POJO(字段名对应属性)【javabean类】
(2)SQL映射XML文件(文件为配置中每个表上的简单CRUD(增删改查)函数生成SQL。)【beanMapper.xml】
(3)符合Spring框架的DAO接口java类【beanMapper.java】


二、配置MBG

1、搭建数据库

tbl_employee表【d_id 是外键 对应 tbl_dept表】

id	last_name    gender	  email       d_id
1	   mike	       0      [email protected]      1
2          book        0      [email protected]    2
3          tom         1      [email protected]    2
4          jerry       1       [email protected]       1

tbl_dept表:

id    dept_name
1      开发部
2      测试部

2、项目需要jar包:

总共需要导入项目的jar包就三个

mybatis.jar
mybatis-generator-core.jar
mysql-connector.jar

3、自动生成代码的配置文件

mbg.xml 【需要放在项目根目录,因为执行代码需要读取匹配配置文件路径】

<?xml version="1.0" encoding="UTF-8"?>
<!DOCTYPE generatorConfiguration
  PUBLIC "-//mybatis.org//DTD MyBatis Generator Configuration 1.0//EN"
  "http://mybatis.org/dtd/mybatis-generator-config_1_0.dtd">
<generatorConfiguration>

	<!-- 
		targetRuntime="MyBatis3Simple":生成简单版的CRUD
		MyBatis3:豪华版	
	 -->
  
  <context id="testTables" targetRuntime="MyBatis3">
		<commentGenerator>
			<!-- 是否去除自动生成的注释 true:是 : false:否 -->
			<property name="suppressAllComments" value="true" />
		</commentGenerator>
		<!--数据库连接的信息:驱动类、连接地址、用户名、密码 -->
  	    <!-- jdbcConnection:指定如何连接到目标数据库 -->
        <jdbcConnection driverClass="com.mysql.jdbc.Driver"
           connectionURL="jdbc:mysql://localhost:3306/mybatis?allowMultiQueries=true"
           userId="root"
           password="Cool123!">
        </jdbcConnection>
	

		<!-- 默认false,把JDBC DECIMAL 和 NUMERIC 类型解析为 Integer,为 true时把JDBC DECIMAL 和
			NUMERIC 类型解析为java.math.BigDecimal -->
		<javaTypeResolver>
			<property name="forceBigDecimals" value="false" />
		</javaTypeResolver>

		<!-- targetProject:生成PO类的位置 -->
		<javaModelGenerator targetPackage="com.mybatis.bean"
			targetProject="./src">
			<!-- enableSubPackages:是否让schema作为包的后缀 -->
			<property name="enableSubPackages" value="false" />
			<!-- 从数据库返回的值被清理前后的空格 -->
			<property name="trimStrings" value="true" />
		</javaModelGenerator>
		
		<!-- targetProject:mapper映射文件生成的位置 -->
		<sqlMapGenerator targetPackage="com.mybatis.mapper"
			targetProject="./conf">
			<!-- enableSubPackages:是否让schema作为包的后缀 -->
			<property name="enableSubPackages" value="false" />
		</sqlMapGenerator>
		
		<!-- targetPackage:mapper接口生成的位置 -->
		<javaClientGenerator type="XMLMAPPER"
			targetPackage="com.mybatis.mapper"
			targetProject="./src">
			<!-- enableSubPackages:是否让schema作为包的后缀 -->
			<property name="enableSubPackages" value="false" />
		</javaClientGenerator>
		
		
		<!-- 指定要逆向分析哪些表:根据表要创建javaBean -->
        <table tableName="tbl_dept" domainObjectName="Department"></table>
        <table tableName="tbl_employee" domainObjectName="Employee"></table>
		
	
	</context>
  
  
</generatorConfiguration>

注意:mbg配置文件中,对各标签有顺序要求。先javaModelGenerator  后 
sqlMapGenerator最后  javaClientGenerator

4、执行代码自动生成文件

新建包 com.mybatis.test,并在下面创建 Junit 测试类  MybatisTest.java

package com.mybatis.test;

import java.io.File;

import java.util.ArrayList;
import java.util.List;

import org.junit.Test;
import org.mybatis.generator.api.MyBatisGenerator;
import org.mybatis.generator.config.Configuration;
import org.mybatis.generator.config.xml.ConfigurationParser;
import org.mybatis.generator.internal.DefaultShellCallback;


public class MybatisTest {

	
	@Test
	public void testMbg() throws Exception {
		List<String> warnings = new ArrayList<String>();
		boolean overwrite = true;
		File configFile = new File("mbg.xml");// mbg.xml为上面创建的配置文件。
		ConfigurationParser cp = new ConfigurationParser(warnings);
		Configuration config = cp.parseConfiguration(configFile);
		DefaultShellCallback callback = new DefaultShellCallback(overwrite);
		MyBatisGenerator myBatisGenerator = new MyBatisGenerator(config, callback, warnings);
		myBatisGenerator.generate(null);

	}

}
生成代码遇到的问题:
1、mbg.xml 必须 放在项目根目录,不能放在 src目录下或者其他目录下。
//因为在自动 生成代码过程中,需要读取 mbg.xml 配置文件,路径需要匹配
File configFile = new File("mbg.xml");// mbg.xml为上面创建的配置文件。
2、报错找不到 : java.time 类,因为这个是java8 的,当前是jdk7代码环境。
java.lang.NoClassDefFoundError: java/time/temporal/TemporalAccessor
at java.lang.Class.forName0(Native Method)
at java.lang.Class.forName(Class.java:278)
at org.mybatis.generator.internal.ObjectFactory.internalClassForName(ObjectFactory.java:142)
at org.mybatis.generator.internal.ObjectFactory.createInternalObject(ObjectFactory.java:178)
3、Mybatis Generator代码不报错,但是没有生成文件

比如:之前是 targetProject=”.\src”  适用于windows,在当前目录的src创建文件。
targetProject=”./src”  适用于 linux ,在当前目录的 src 创建文件。
【Windows 无法识别  ./     同理 linux 也无法识别  .\】

<javaClientGenerator type="XMLMAPPER"
	targetPackage="com.mybatis.mapper"
	targetProject=".\src">
	<!-- enableSubPackages:是否让schema作为包的后缀 -->
	<property name="enableSubPackages" value="false" />
</javaClientGenerator>

MBG 配置目录的时候 targetProject=“./src”  需要知道 是windows环境还是mac环境。主要是 目录设置问题。windows环境:.\    mac环境:./ 

当然目录可以去掉前面./或.\  直接开始写文件夹就行了,这样子 mac和windows都可以运行了。


mybatis框架整合-SSM简单入门详解

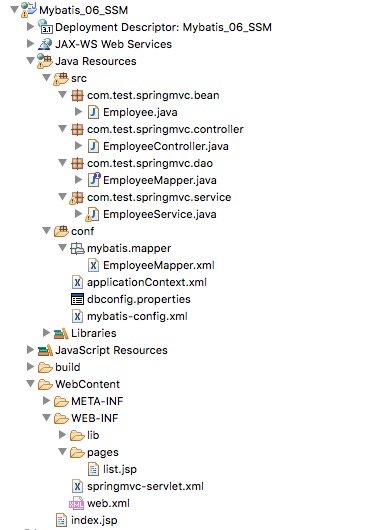
为了方便复习,总结了SSM框架的搭建过程:
用的是eclipse 和tomcat服务器。创建了一个 Dynamic web project。
有关这些基础相关资料,可以查找网络。

一、项目整合概览


二、项目jar包介绍

jar包下载地址:http://central.maven.org/maven2/org/springframework/

其实,source.jar 是用来查看源代码的,javadoc.jar 是用来查看 文档的。这些可以去掉。

1、Spring IOC jar包:

core , content , bean , 在启动服务器 时需要 common log,在加载 容器时 需要 expression(spring 的标签语言),aop模块(面向切面编程)

2、SpringMVC jar包

只要 spring-webmvc.jar 包就行了。如果整合 struts框架,那么spring-webmvc.jar这个就不用了,spring 整合 Struts时 用 Struts 提供的整合 插件

3、jsp页面用jstl标签语言

当在jsp页面使用 jstl标签语言时,需要导入 jstl.jar 包。
比如 <%@taglib prefix="c" uri="http://java.sun.com/jsp/jstl/core" %>

4、数据库问题

mybatis核心包【mybatis.jar 】
mybatis 与spring整合包【mybatis-spring.jar】

mysql数据库驱动包 【mysql-connector.jar】

数据库 解析注解事务 【spring-tx.jar】

<!-- spring IOC 容器配置文件中, 开启基于注解的事务 -->
<tx:annotation-driven transaction-manager="dataSourceTransactionManager"/>

数据源包:根据不同数据源 配置,导入不同包

下面就是 导入 spring-jdbc.jar

<!-- spring IOC 容器配置文件中, 配置数据源 -->
<bean id="dataSource" class="org.springframework.jdbc.datasource.DriverManagerDataSource">
	<property name="driverClassName" value="com.mysql.jdbc.Driver" />
	<!-- http://jingyan.baidu.com/article/b7001fe197a3f60e7282dd8d.html 中文数据库存取乱码问题 -->
	<property name="url" value="jdbc:mysql://127.0.0.1:3306/mybatis?useUnicode=true&amp;characterEncoding=UTF-8" />
	<property name="username" value="root" />
	<property name="password" value="Cool123!" />
</bean>

当然数据库配置文件,可以写在properties文件中,然后用${}引用。比如下面
当然这里的数据源也修改了:所以要用 c3p0.jar 包。

<!-- 引入数据库的配置文件 -->
<context:property-placeholder location="classpath:dbconfig.properties" />
<!-- Spring IOC 容器配置文件中,用来控制数据源 -->
<bean id="dataSource" class="com.mchange.v2.c3p0.ComboPooledDataSource">
	<property name="jdbcUrl" value="${jdbc.url}"></property>
	<property name="driverClass" value="${jdbc.driver}"></property>
	<property name="user" value="${jdbc.username}"></property>
	<property name="password" value="${jdbc.password}"></property>
</bean>

关于数据源的写法,也可以有另一种写法:

<bean id="dataSource" class="org.springframework.jdbc.datasource.DriverManagerDataSource">
	<property name="driverClassName">
		<value>com.mysql.jdbc.Driver</value>
	</property>
	<property name="url">
		<value>jdbc:mysql://127.0.0.1:3306/mybatis?useUnicode=true&amp;characterEncoding=UTF-8
		</value>
	</property>
	<property name="username">
		<value>root</value>
	</property>
	<property name="password">
		<value>Cool123!</value>
	</property>
</bean>

三、数据库搭建

简单举例:

id	last_name    gender	  email      
1	   mike	       0      [email protected]     
2          book        0      [email protected]   
3          tom         1      [email protected]   
4          jerry       1       [email protected]       

四、SSM项目搭建

1、编辑web.xml

文件中添加了:
1、spring-mvc 配置文件【springmvc-servlet.xml】
2、spring-ioc 配置文件【applicationContext.xml】

<?xml version="1.0" encoding="UTF-8"?>
<web-app xmlns:xsi="http://www.w3.org/2001/XMLSchema-instance" xmlns="http://xmlns.jcp.org/xml/ns/javaee" xsi:schemaLocation="http://xmlns.jcp.org/xml/ns/javaee http://xmlns.jcp.org/xml/ns/javaee/web-app_3_1.xsd" id="WebApp_ID" version="3.1">
  <display-name>Mybatis_06_SSM</display-name>
 
 
   <!--Spring配置: needed for ContextLoaderListener -->
	<context-param>
		<param-name>contextConfigLocation</param-name>
		<param-value>classpath:applicationContext.xml</param-value>
	</context-param>

	<!-- Bootstraps the root web application context before servlet initialization -->
	<listener>
		<listener-class>org.springframework.web.context.ContextLoaderListener</listener-class>
	</listener>
	
	<!-- SpringMVC配置 -->
	<!-- The front controller of this Spring Web application, responsible for handling all application requests -->
	<servlet>
		<servlet-name>springmvc</servlet-name>
		<servlet-class>org.springframework.web.servlet.DispatcherServlet</servlet-class>
		<load-on-startup>1</load-on-startup>
	</servlet>

	<!-- Map all requests to the DispatcherServlet for handling -->
	<servlet-mapping>
		<servlet-name>springmvc</servlet-name>
		<url-pattern>/</url-pattern>
	</servlet-mapping>
 

  <welcome-file-list>
    <welcome-file>index.html</welcome-file>
    <welcome-file>index.htm</welcome-file>
    <welcome-file>index.jsp</welcome-file>
  </welcome-file-list>
  
</web-app>

2、配置springmvc-servlet.xml

<?xml version="1.0" encoding="UTF-8"?>
<beans xmlns="http://www.springframework.org/schema/beans"
	xmlns:xsi="http://www.w3.org/2001/XMLSchema-instance"
	xmlns:context="http://www.springframework.org/schema/context"
	xmlns:mvc="http://www.springframework.org/schema/mvc"
	xsi:schemaLocation="http://www.springframework.org/schema/mvc http://www.springframework.org/schema/mvc/spring-mvc-4.0.xsd
		http://www.springframework.org/schema/beans http://www.springframework.org/schema/beans/spring-beans.xsd
		http://www.springframework.org/schema/context http://www.springframework.org/schema/context/spring-context-4.0.xsd">

	<!--SpringMVC只是控制网站跳转逻辑  -->
	<!-- 只扫描控制器 -->
	<context:component-scan base-package="com.test.springmvc" use-default-filters="false">
		<context:include-filter type="annotation" expression="org.springframework.stereotype.Controller"/>
	</context:component-scan>
	
	<!-- 视图解析器 -->
	<bean class="org.springframework.web.servlet.view.InternalResourceViewResolver">
		<property name="prefix" value="/WEB-INF/pages/"></property>
		<property name="suffix" value=".jsp"></property>
	</bean>
	
	<mvc:annotation-driven></mvc:annotation-driven>
	<mvc:default-servlet-handler/>
</beans>

3、编辑请求页面

<%@ page language="java" contentType="text/html; charset=UTF-8"
    pageEncoding="UTF-8"%>
<!DOCTYPE html PUBLIC "-//W3C//DTD HTML 4.01 Transitional//EN" "http://www.w3.org/TR/html4/loose.dtd">
<html>
<head>
<meta http-equiv="Content-Type" content="text/html; charset=UTF-8">
<title>Insert title here</title>
</head>
<body>
<a href="getemps">查询所有员工</a>
</body>
</html>

4、编辑控制器controller层

package com.test.springmvc.controller;

import java.util.List;
import java.util.Map;

import org.springframework.beans.factory.annotation.Autowired;
import org.springframework.stereotype.Controller;
import org.springframework.web.bind.annotation.RequestMapping;

import com.test.springmvc.bean.Employee;
import com.test.springmvc.service.EmployeeService;

@Controller
public class EmployeeController {
	
	@Autowired
	EmployeeService employeeService;
	
	@RequestMapping("/getemps")
	public String emps(Map<String,Object> map){
		List<Employee> emps = employeeService.getEmps();
		map.put("allEmps", emps);
		return "list";
	}

}

5、编辑bean层和显示结果页

Employee.java

package com.test.springmvc.bean;


public class Employee {
	
	
	private Integer id;
	private String lastName;
	private String email;
	private String gender;
	
	public Employee() {
		super();
	}
	

	public Employee(Integer id, String lastName, String email, String gender) {
		super();
		this.id = id;
		this.lastName = lastName;
		this.email = email;
		this.gender = gender;
	}
	

	public Integer getId() {
		return id;
	}
	public void setId(Integer id) {
		this.id = id;
	}
	public String getLastName() {
		return lastName;
	}
	public void setLastName(String lastName) {
		this.lastName = lastName;
	}
	public String getEmail() {
		return email;
	}
	public void setEmail(String email) {
		this.email = email;
	}
	public String getGender() {
		return gender;
	}
	public void setGender(String gender) {
		this.gender = gender;
	}
	
	@Override
	public String toString() {
		return "Employee [id=" + id + ", lastName=" + lastName + ", email="
				+ email + ", gender=" + gender + "]";
	}
	
}

list.jsp

<%@ page language="java" contentType="text/html; charset=UTF-8"
    pageEncoding="UTF-8"%>
<%@taglib prefix="c" uri="http://java.sun.com/jsp/jstl/core" %>
<!DOCTYPE html PUBLIC "-//W3C//DTD HTML 4.01 Transitional//EN" "http://www.w3.org/TR/html4/loose.dtd">
<html>
<head>
<meta http-equiv="Content-Type" content="text/html; charset=UTF-8">
<title>员工列表</title>
</head>
<body>
	<table>
			<tr>
				<td>id</td>
				<td>lastName</td>
				<td>email</td>
				<td>gender</td>
			</tr>
		<c:forEach items="${allEmps }" var="emp">
			<tr>
				<td>${emp.id }</td>
				<td>${emp.lastName }</td>
				<td>${emp.email }</td>
				<td>${emp.gender }</td>
			</tr>
		</c:forEach>
	
	</table>

</body>
</html>

6、编辑Service层和Dao层

EmployeeService.java

package com.test.springmvc.service;

import java.util.List;

import org.apache.ibatis.session.SqlSession;
import org.springframework.beans.factory.annotation.Autowired;
import org.springframework.stereotype.Service;

import com.test.springmvc.bean.Employee;
import com.test.springmvc.dao.EmployeeMapper;

@Service
public class EmployeeService {
	
	@Autowired
	private EmployeeMapper employeeMapper;
	
	@Autowired
	private SqlSession sqlSession;
	
	public List<Employee> getEmps(){
		
		return employeeMapper.getEmps();
	}

}

EmployeeMapper.java

package com.test.springmvc.dao;


import java.util.List;

import com.test.springmvc.bean.Employee;


public interface EmployeeMapper {
	
	public Employee getEmpById(Integer id);
	
	public List<Employee> getEmps();
	

}

7、编辑applicationContext.xml

<?xml version="1.0" encoding="UTF-8"?>
<beans xmlns="http://www.springframework.org/schema/beans"
	xmlns:xsi="http://www.w3.org/2001/XMLSchema-instance"
	xmlns:context="http://www.springframework.org/schema/context"
	xmlns:mybatis-spring="http://mybatis.org/schema/mybatis-spring"
	xmlns:tx="http://www.springframework.org/schema/tx"
	xsi:schemaLocation="http://www.springframework.org/schema/beans http://www.springframework.org/schema/beans/spring-beans.xsd
		http://mybatis.org/schema/mybatis-spring http://mybatis.org/schema/mybatis-spring-1.2.xsd
		http://www.springframework.org/schema/tx http://www.springframework.org/schema/tx/spring-tx-4.0.xsd
		http://www.springframework.org/schema/context http://www.springframework.org/schema/context/spring-context-4.0.xsd">

	<!-- Spring希望管理所有的业务逻辑组件,等。。。 -->
	<context:component-scan base-package="com.test.springmvc">
		<context:exclude-filter type="annotation"
			expression="org.springframework.stereotype.Controller" />
	</context:component-scan>

<!-- 引入数据库的配置文件 -->
<!-- 	
	<context:property-placeholder location="classpath:dbconfig.properties" />
	Spring用来控制业务逻辑。数据源、事务控制、aop
	<bean id="dataSource" class="com.mchange.v2.c3p0.ComboPooledDataSource">
		<property name="jdbcUrl" value="${jdbc.url}"></property>
		<property name="driverClass" value="${jdbc.driver}"></property>
		<property name="user" value="${jdbc.username}"></property>
		<property name="password" value="${jdbc.password}"></property>
	</bean> -->
	
	
	<bean id="dataSource" class="org.springframework.jdbc.datasource.DriverManagerDataSource">
		<property name="driverClassName" value="com.mysql.jdbc.Driver" />
		<!-- http://jingyan.baidu.com/article/b7001fe197a3f60e7282dd8d.html 中文数据库存取乱码问题 -->
		<property name="url" value="jdbc:mysql://127.0.0.1:3306/mybatis?useUnicode=true&amp;characterEncoding=UTF-8" />
		<property name="username" value="root" />
		<property name="password" value="Kitty521!" />
	</bean>
	
	<!-- <bean id="dataSource" class="org.springframework.jdbc.datasource.DriverManagerDataSource">
		<property name="driverClassName">
			<value>com.mysql.jdbc.Driver</value>
		</property>
		<property name="url">
			<value>jdbc:mysql://127.0.0.1:3306/mybatis?useUnicode=true&amp;characterEncoding=UTF-8
			</value>
		</property>
		<property name="username">
			<value>root</value>
		</property>
		<property name="password">
			<value>Kitty521!</value>
		</property>
	</bean> -->
	
	
	<!-- spring事务管理 -->
	<bean id="dataSourceTransactionManager" class="org.springframework.jdbc.datasource.DataSourceTransactionManager">
		<property name="dataSource" ref="dataSource"></property>
	</bean>

	<!-- 开启基于注解的事务 -->
	<tx:annotation-driven transaction-manager="dataSourceTransactionManager"/>
	
	<!-- 
	整合mybatis 
		目的:1、spring管理所有组件。mapper的实现类。
				service==>Dao   @Autowired:自动注入mapper;
			2、spring用来管理事务,spring声明式事务
	-->
	<!--创建出SqlSessionFactory对象  -->
	<bean id="sqlSessionFactoryBean" class="org.mybatis.spring.SqlSessionFactoryBean">
		<property name="dataSource" ref="dataSource"></property>
		<!-- configLocation指定全局配置文件的位置 -->
		<property name="configLocation" value="classpath:mybatis-config.xml"></property>
		<!--mapperLocations: 指定mapper文件的位置-->
		<property name="mapperLocations" value="classpath:mybatis/mapper/*.xml"></property>
	</bean>
	
	
	<!-- 扫描所有的mapper接口的实现,让这些mapper能够自动注入;
	base-package:指定mapper接口的包名
	 -->
	<mybatis-spring:scan base-package="com.test.springmvc.dao"/>
	<!-- <bean class="org.mybatis.spring.mapper.MapperScannerConfigurer">
		<property name="basePackage" value="com.test.springmvc.dao"></property>
	</bean> -->
	
</beans>

8、数据库配置文件和mybatis全局配置文件

dbconfig.properties

jdbc.driver=com.mysql.jdbc.Driver
jdbc.url=jdbc:mysql://localhost:3306/mybatis?allowMultiQueries=true
jdbc.username=root
jdbc.password=Cool123!

orcl.driver=oracle.jdbc.OracleDriver
orcl.url=jdbc:oracle:thin:@localhost:1521:orcl
orcl.username=scott
orcl.password=123456

mybatis-config.xml

<?xml version="1.0" encoding="UTF-8" ?>
<!DOCTYPE configuration
 PUBLIC "-//mybatis.org//DTD Config 3.0//EN"
 "http://mybatis.org/dtd/mybatis-3-config.dtd">
<configuration>
	
    <!--显式的指定每个我们需要更改的配置的值,即使他是默认的。防止版本更新带来的问题  -->
	<settings>
		
		<!-- 开启数据库字段 自动 驼峰大小写转换,比如数据库 last_name 字段 会自动转换 赋值给bean中 的 lastName 属性-->
		<setting name="mapUnderscoreToCamelCase" value="true"/>
		
		<!-- 主要是因为 插入 null 到 oracle会报错,因为插入类型是JdbcType OTHER ,所以这里设置类型 为 NULL  来解决oracle 插入null报错问题-->
		<setting name="jdbcTypeForNull" value="NULL"/>
		
		<!-- 下面两个设置,是为了开启 mybatis的 延迟加载功能 -->
		<setting name="lazyLoadingEnabled" value="true"/>
		<setting name="aggressiveLazyLoading" value="false"/>
		
	</settings>
	
	<!-- 给数据库类型取别名,方便SQL映射文件,可以根据不同类型数据库,来写相应SQL语句 -->
	<databaseIdProvider type="DB_VENDOR">
		<property name="MySQL" value="mysql"/>
		<property name="Oracle" value="oracle"/>
		<property name="SQL Server" value="sqlserver"/>
	</databaseIdProvider>
	
<!-- 已经在 spring ioc 容器中 配置了 sql 映射文件了,这里就不需要了写了,两个地方只要 有一个地方写了SQL映射文件就行
    <mappers>
	<mapper resource="mybatis/mapper/EmployeeMapper.xml" />
	</mappers> -->
	
</configuration>

9、mybatis之SQL映射文件

EmployeeMapper.xml

<?xml version="1.0" encoding="UTF-8" ?>
<!DOCTYPE mapper
 PUBLIC "-//mybatis.org//DTD Mapper 3.0//EN"
 "http://mybatis.org/dtd/mybatis-3-mapper.dtd">
<mapper namespace="com.test.springmvc.dao.EmployeeMapper">

	<!-- public Employee getEmpById(Integer id); -->
	<select id="getEmpById" resultType="com.test.springmvc.bean.Employee">
		select * from tbl_employee where id=#{id}
	</select>
	
	<!--public List<Employee> getEmps();  -->
	<select id="getEmps" resultType="com.test.springmvc.bean.Employee">
		select * from tbl_employee
	</select>
</mapper>


mybatis缓存-(2)-缓存原理与整合第三方缓存管理

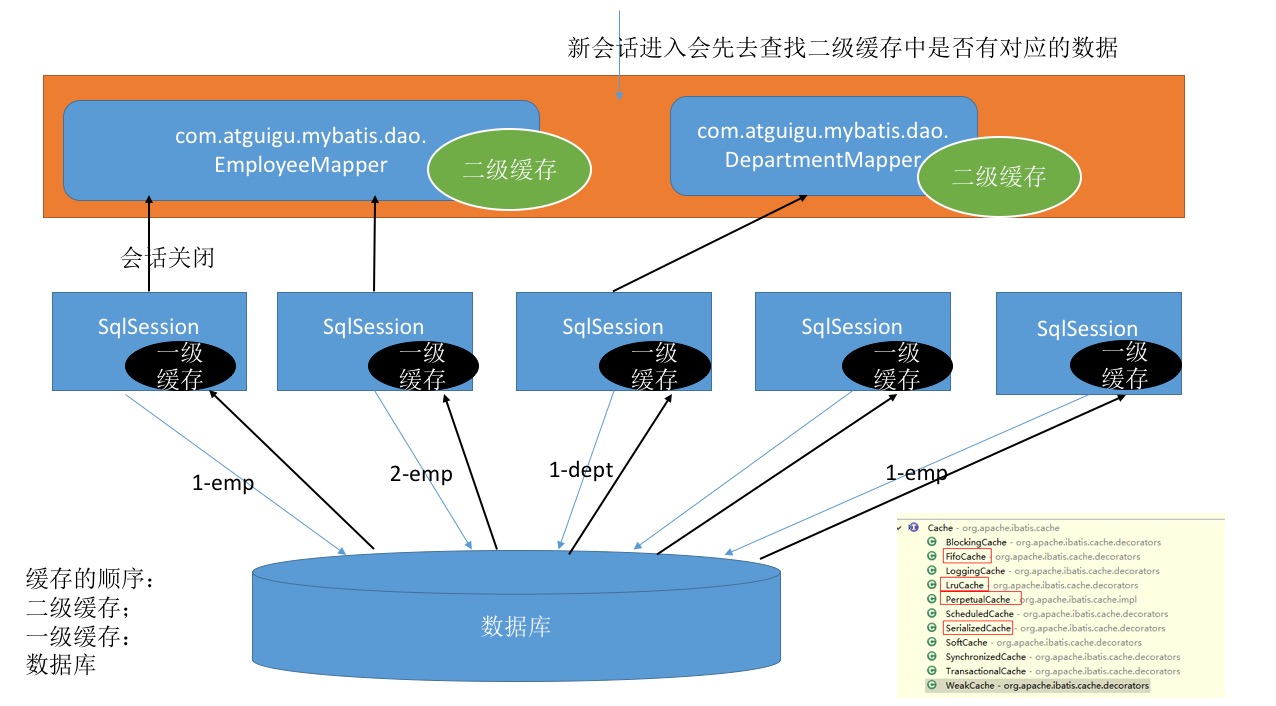
一、缓存原理

二、第三方缓存管理

简单介绍:本质是自定义二级缓存的管理类。

*第三方缓存整合:
1)、导入第三方缓存包即可;
2)、导入与第三方缓存整合的适配包;官方有;
3)、mapper.xml中使用自定义缓存 ,比如 如下
<cache type="org.mybatis.caches.ehcache.EhcacheCache"></cache>

比如:ehcache缓存管理:

1、需要如下jar包,到项目中。

下面三个是:ehcache 缓存管理的核心类
ehcache-core-2.6.8.jar
slf4j-api-1.6.1.jar
slf4j-log4j12-1.6.2.jar

下面是 mybatis 二级缓存 的接口适配类,用于和ehcache 通信。
mybatis-ehcache-1.0.3.jar

2、在map的sql映射文件中,配置 mybatis 二级缓存的 管理类
<cache type="org.mybatis.caches.ehcache.EhcacheCache"></cache>

mybatis缓存-(1)-一级缓存和二级缓存及缓存配置和属性

搭建数据库


对数据库简化,可以看成是这样的数据库:

id	last_name    gender	  email      
1	   mike	       0      [email protected]      
2          book        0      [email protected]   
3          tom         1      [email protected]    
4          jerry       1       [email protected]

一级缓存介绍


之前的学习和设置过程中,都是用的一级缓存了。

 * 一级缓存:(本地缓存):
sqlSession级别的缓存。一级缓存是一直开启的;SqlSession级别的一个Map
与数据库同一次会话期间查询到的数据会放在本地缓存中。
以后如果需要获取相同的数据,直接从缓存中拿,没必要再去查询数据库;

一级缓存失效情况(没有使用到当前一级缓存的情况,效果就是,还需要再向数据库发出查询):
1、sqlSession不同。
2、sqlSession相同,查询条件不同.(当前一级缓存中还没有这个数据)
3、sqlSession相同,两次查询之间执行了增删改操作(这次增删改可能对当前数据有影响)
4、sqlSession相同,手动清除了一级缓存【openSession.clearCache();】(缓存清空)

Junit测试用例:

@Test
public void testFirstLevelCache() throws IOException{
	SqlSessionFactory sqlSessionFactory = getSqlSessionFactory();
	SqlSession openSession = sqlSessionFactory.openSession();
	try{
		EmployeeMapper mapper = openSession.getMapper(EmployeeMapper.class);
		Employee emp01 = mapper.getEmpById(1);
		System.out.println(emp01);
			
		//xxxxx
		//1、sqlSession不同。
		//SqlSession openSession2 = sqlSessionFactory.openSession();
		//EmployeeMapper mapper2 = openSession2.getMapper(EmployeeMapper.class);
			
		//2、sqlSession相同,查询条件不同
			
		//3、sqlSession相同,两次查询之间执行了增删改操作(这次增删改可能对当前数据有影响)
		//mapper.addEmp(new Employee(null, "testCache", "cache", "1"));
		//System.out.println("数据添加成功");
			
		//4、sqlSession相同,手动清除了一级缓存(缓存清空)
		//openSession.clearCache();
			
		Employee emp02 = mapper.getEmpById(1);
		//Employee emp03 = mapper.getEmpById(3);
		System.out.println(emp02);
		//System.out.println(emp03);
		System.out.println(emp01==emp02);
			
		//openSession2.close();
	}finally{
		openSession.close();
	}
}

二级缓存介绍


基本介绍

 * 二级缓存:(全局缓存):基于namespace级别的缓存:一个namespace对应一个二级缓存:
 * 	工作机制:
 * 	1、一个会话,查询一条数据,这个数据就会被放在当前会话的一级缓存中;
 * 	2、如果会话关闭;一级缓存中的数据会被保存到二级缓存中;新的会话查询信息,就可以参照二级缓存中的内容;
 * 	3、sqlSession===EmployeeMapper==>Employee
 * 			  DepartmentMapper===>Department
 * 		不同namespace查出的数据会放在自己对应的缓存中(map)
 * 		效果:数据会从二级缓存中获取
 * 			查出的数据都会被默认先放在一级缓存中。
 * 			只有会话提交或者关闭以后,一级缓存中的数据才会转移到二级缓存中
 * 	使用:
 * 	1)、开启全局二级缓存配置:<setting name="cacheEnabled" value="true"/>
 * 	2)、去mapper.xml中配置使用二级缓存:
 * 				<cache></cache>
 * 	3)、我们的POJO需要实现序列化接口

1、全局配置文件开启二级缓存

<settings>
	<!--显式的指定每个我们需要更改的配置的值,即使他是默认的。防止版本更新带来的问题 -->
	<!-- 开启二级缓存 -->
	<setting name="cacheEnabled" value="true" />
</settings>

2、对javabean进行序列化

package com.mybatis.bean;

import java.io.Serializable;

public class Employee implements Serializable {
	/**
	 * 
	 */
	private static final long serialVersionUID = 1L;
	
	private int id;
	private String lastName;
	private String email;
	private String gender;

	public int getId() {
		return id;
	}

	public void setId(int id) {
		this.id = id;
	}

	public String getLastName() {
		return lastName;
	}

	public void setLastName(String lastName) {
		this.lastName = lastName;
	}

	public String getEmail() {
		return email;
	}

	public void setEmail(String email) {
		this.email = email;
	}

	public String getGender() {
		return gender;
	}

	public void setGender(String gender) {
		this.gender = gender;
	}

	@Override
	public String toString() {
		return "Employee [id=" + id + ", lastName=" + lastName + ", email=" + email + ", gender=" + gender + "]";
	}

}

3、配置SQL映射

<?xml version="1.0" encoding="UTF-8" ?>
<!DOCTYPE mapper
 PUBLIC "-//mybatis.org//DTD Mapper 3.0//EN"
 "http://mybatis.org/dtd/mybatis-3-mapper.dtd">
<mapper namespace="com.mybatis.mapper.EmployeeMapper">

 <cache eviction="FIFO" flushInterval="60000" readOnly="false" size="1024"></cache>
	<!--  
	eviction:缓存的回收策略:
		• LRU – 最近最少使用的:移除最长时间不被使用的对象。
		• FIFO – 先进先出:按对象进入缓存的顺序来移除它们。
		• SOFT – 软引用:移除基于垃圾回收器状态和软引用规则的对象。
		• WEAK – 弱引用:更积极地移除基于垃圾收集器状态和弱引用规则的对象。
		• 默认的是 LRU。
	flushInterval:缓存刷新间隔
		缓存多长时间清空一次,默认不清空,设置一个毫秒值
	readOnly:是否只读:
		true:只读;mybatis认为所有从缓存中获取数据的操作都是只读操作,不会修改数据。
				 mybatis为了加快获取速度,直接就会将数据在缓存中的引用交给用户。不安全,速度快
		false:非只读:mybatis觉得获取的数据可能会被修改。
				mybatis会利用序列化&反序列的技术克隆一份新的数据给你。安全,速度慢
	size:缓存存放多少元素;
	type="":指定自定义缓存的全类名;
			实现Cache接口即可;
	--> 
 
	<select id="getEmpById" resultType="com.mybatis.bean.Employee">
		select id,last_name lastName,email,gender from tbl_employee where id = #{id}
	</select>
	
	
</mapper>

4、Junit测试用例:

@Test
public void testSecondLevelCache() throws IOException{
	SqlSessionFactory sqlSessionFactory = getSqlSessionFactory();
	SqlSession openSession = sqlSessionFactory.openSession();
	SqlSession openSession2 = sqlSessionFactory.openSession();
	try{
		//1、
		EmployeeMapper mapper = openSession.getMapper(EmployeeMapper.class);
		EmployeeMapper mapper2 = openSession2.getMapper(EmployeeMapper.class);
			
		Employee emp01 = mapper.getEmpById(1);
		System.out.println("对象一"+emp01);
			
		openSession.clearCache();//清除了一级缓存,但不会清除二级缓存
			
		openSession.close();
		System.out.println("对象一 关闭");
                
                //即使执行下面这句 居然 也不会 报错 
		//openSession.clearCache();//清除了一级缓存,但不会清除二级缓存
			
                //第二次查询是从二级缓存中拿到的数据,并没有发送新的sql 
                Employee emp02 = mapper2.getEmpById(1);
		System.out.println("对象二"+emp02);
		openSession2.close();
		System.out.println("对象二 关闭");

			
	}finally{
			
	}
}

三、缓存配置和属性


 * 和缓存有关的设置/属性:
 * 1)、cacheEnabled=true:false:关闭缓存(二级缓存关闭)(一级缓存一直可用的)
 * 2)、每个select标签都有useCache="true":
 *         false:不使用缓存(一级缓存依然使用,二级缓存不使用)
 * 3)、【每个增删改标签的:flushCache="true":(一级二级都会清除)】
 * 	  增删改执行完成后就会清楚缓存;
 * 	  测试:flushCache="true":一级缓存就清空了;二级也会被清除;
 * 	  查询标签:flushCache="false":
 * 	  如果flushCache=true;每次查询之后都会清空缓存;缓存是没有被使用的;
 * 4)、sqlSession.clearCache();只是清楚当前session的一级缓存;
 * 5)、localCacheScope:本地缓存作用域:【这个是全局配置文件中的setting】
 *                 1、SESSION(一级缓存);当前会话的所有数据保存在会话缓存中;
 * 		   2、STATEMENT:可以禁用一级缓存;


mybatis动态sql-(7)-内置参数和绑定

1、编辑接口文件方法

//内置参数
public List<Employee> getEmpsTestInnerParameter(Employee employee);

2、编辑全局配置文件,设置databaseId

<?xml version="1.0" encoding="UTF-8" ?>
<!DOCTYPE configuration
 PUBLIC "-//mybatis.org//DTD Config 3.0//EN"
 "http://mybatis.org/dtd/mybatis-3-config.dtd">
<configuration>

	<settings>
		<setting name="mapUnderscoreToCamelCase" value="true" />
	</settings>

	<environments default="development">
		<environment id="development">
			<transactionManager type="JDBC" />
			<dataSource type="POOLED">
				<property name="driver" value="com.mysql.jdbc.Driver" />
				<property name="url" value="jdbc:mysql://localhost:3306/mybatis" />
				<property name="username" value="root" />
				<property name="password" value="Cool123!" />
			</dataSource>
		</environment>
	</environments>

	<databaseIdProvider type="DB_VENDOR">
		<!-- 为不同的数据库厂商起别名 -->
		<property name="MySQL" value="mysql" />
		<property name="Oracle" value="oracle" />
		<property name="SQL Server" value="sqlserver" />
	</databaseIdProvider>


	<!-- 将我们写好的sql映射文件(EmployeeMapper.xml)一定要注册到全局配置文件(mybatis-config.xml)中 
		如果 数据库全局文件 和 子配置文件 不在同一个目录 ,就需要 /目录/目录/.../EmployeeMapper_old.xml -->
	<mappers>

		<!-- 新方法操作mybatis 需要 的配置文件 -->
		<mapper resource="EmployeeMapperDynamicSQL.xml" />
	</mappers>
</configuration>

3、编辑SQL映射文件

<!-- 两个内置参数:
	 不只是方法传递过来的参数可以被用来判断,取值。。。
	 mybatis默认还有两个内置参数:
	 _parameter:代表整个参数
	 	单个参数:_parameter就是这个参数
	 	多个参数:参数会被封装为一个map;_parameter就是代表这个map
	 	
	 _databaseId:如果配置了databaseIdProvider标签。
	 	_databaseId就是代表当前数据库的别名oracle
-->
	  
<!--public List<Employee> getEmpsTestInnerParameter(Employee employee);  -->
 <select id="getEmpsTestInnerParameter" resultType="com.mybatis.bean.Employee">
	  	<!-- bind:可以将OGNL表达式的值绑定到一个变量中,方便后来引用这个变量的值 -->
	  	<bind name="_lastName" value="'%'+lastName+'%'"/>
	  	<if test="_databaseId=='mysql'">
	  		select * from tbl_employee
	  		<if test="_parameter!=null">
	  			where last_name like #{_lastName}
	  		</if>
	  	</if>
	  	<if test="_databaseId=='oracle'">
	  		select * from employees
	  		<if test="_parameter!=null">
	  			where last_name like #{_parameter.lastName}
	  		</if>
	  	</if>
 </select>

一般情况下:绑定不怎么用如  where last_name like #{_lastName}  _lastName是绑定,但是写在代码中,可以更方便的修改 模糊查询。

<bind name="_lastName" value="'%'+lastName+'%'"/>
	  <if test="_databaseId=='mysql'">
	  	select * from tbl_employee
	  	<if test="_parameter!=null">
	  		where last_name like #{_lastName}
	  	</if>
	  </if>

4、编辑Junit测试文件

@Test
public void testInnerParam() throws IOException{
	SqlSessionFactory sqlSessionFactory = getSqlSessionFactory();
	SqlSession openSession = sqlSessionFactory.openSession();
	try{
		EmployeeMapperDynamicSQL mapper = openSession.getMapper(EmployeeMapperDynamicSQL.class);
		Employee employee2 = new Employee();
		employee2.setLastName("e");
		List<Employee> list = mapper.getEmpsTestInnerParameter(employee2);
		for (Employee employee : list) {
			System.out.println(employee);
		}
	}finally{
		openSession.close();
	}
}


mybatis动态sql-(6)-批量插入foreach与sql片段抽取

mysql批量插入与oracle批量插入不同

一、搭建数据库

tbl_employee表【d_id 是外键 对应 tbl_dept表】

id	last_name    gender	  email       d_id
1	   mike	       0      [email protected]      1
2          book        0      [email protected]    2
3          tom         1      [email protected]    2
4          jerry       1       [email protected]       1

tbl_dept表:

id    dept_name
1      开发部
2      测试部

二、编辑javabean

package com.mybatis.bean;

public class Employee {
	private Integer id;
	private String lastName;
	private String email;
	private String gender;
	private Department department;

	
	public Department getDepartment() {
		return department;
	}

	public void setDepartment(Department department) {
		this.department = department;
	}

	public int getId() {
		return id;
	}

	public void setId(int id) {
		this.id = id;
	}

	public String getLastName() {
		return lastName;
	}

	public void setLastName(String lastName) {
		this.lastName = lastName;
	}

	public String getEmail() {
		return email;
	}

	public void setEmail(String email) {
		this.email = email;
	}

	public String getGender() {
		return gender;
	}

	public void setGender(String gender) {
		this.gender = gender;
	}

	@Override
	public String toString() {
		return "Employee [id=" + id + ", lastName=" + lastName + ", email=" + email + ", gender=" + gender + "]";
	}
	
   /*****  关键是 这个地方啊 出了 问题 ****/
	public Employee() {
		super();
	}
	/*****/
	public Employee(Integer id,String lastName, String  email, String gender){
		this.id =id;
		this.lastName =lastName;
		this.email =email;
		this.gender =gender;
		
	}
	
	public Employee(Integer id,String lastName, String  email, String gender,Department dep){
		this.id =id;
		this.lastName =lastName;
		this.email =email;
		this.gender =gender;
		this.department =dep;
	}
	
//  历史教训 ,一开始 没有添加 无参构造函数,而添加了下面这个函数	
//	public Employee(Integer id,String lastName, String  email, String gender,int temp){
//		this.id =id;
//		this.lastName =lastName;
//		this.email =email;
//		this.gender =gender;
//		
//		System.out.println(" id:"+id+" lastName:"+lastName+" email:"+email+" gender:"+gender+" temp:"+temp);
//	}

}
package com.mybatis.bean;

import java.util.List;

public class Department {

	private Integer id;
	private String departmentName;
	private List<Employee> employees;

	public Department() {
		
	}
	
    public Department(int id){
    	this.id = id;
		
	}

	public List<Employee> getEmployees() {
		return employees;
	}

	public void setEmployees(List<Employee> employees) {
		this.employees = employees;
	}

	public Integer getId() {
		return id;
	}

	public void setId(Integer id) {
		this.id = id;
	}

	public String getDepartmentName() {
		return departmentName;
	}

	public void setDepartmentName(String departmentName) {
		this.departmentName = departmentName;
	}

	@Override
	public String toString() {
		return "Department [id=" + id + ", departmentName=" + departmentName + "]";
	}

}


三、编辑junit测试

@Test
public void testBatchSave() throws IOException{
	SqlSessionFactory sqlSessionFactory = getSqlSessionFactory();
	SqlSession openSession = sqlSessionFactory.openSession();
	try{
		EmployeeMapperDynamicSQL mapper = openSession.getMapper(EmployeeMapperDynamicSQL.class);
		List<Employee> emps = new ArrayList<>();
		emps.add(new Employee(null, "smith0x1", "[email protected]", "1" , new Department(1) ));
		emps.add(new Employee(null, "allen0x1", "[email protected]", "0" , new Department(1) ));
		mapper.addEmps(emps);
		openSession.commit();
	}finally{
		openSession.close();
	}
}

四、编辑SQl映射文件

1、mysql 版

 <!--MySQL下批量保存:可以foreach遍历   mysql支持values(),(),()语法-->
<!-- 批量保存 -->
 <!--public void addEmps(@Param("emps")List<Employee> emps);  -->
 <!--MySQL下批量保存:可以foreach遍历   mysql支持values(),(),()语法-->
<insert id="addEmps">
	 insert into tbl_employee(last_name,email,gender,d_id) 
	values
	<foreach collection="emps" item="emp" separator=",">
		(#{emp.lastName},#{emp.email},#{emp.gender},#{emp.department.id})
	</foreach>
 </insert><!--   -->
	 
 <!-- 这种方式需要数据库连接属性allowMultiQueries=true;
	 这种分号分隔多个sql可以用于其他的批量操作(删除,修改) -->
 <!-- <insert id="addEmps">
	 <foreach collection="emps" item="emp" separator=";">
	 	insert into tbl_employee(last_name,email,gender,d_id)
	 	values(#{emp.lastName},#{emp.email},#{emp.gender},#{emp.department.id})
	 </foreach>
 </insert> -->

mysql补充:在mysql配置时,我们可能需要配置 allowMultiQueries=true
jdbc.url=jdbc:mysql://localhost:3306/mybatis?allowMultiQueries=true

若一个sql中通过分号分割(或包含)了多个独立sql的话,如:
select 'hello';select 'world'
就会报如下错:
com.mysql.jdbc.exceptions.jdbc4.MySQLSyntaxErrorException: You have an error in your SQL syntax; check the manual that corresponds to your MySQL server version for the right syntax to use near 'select 'world'' at line 1
	at sun.reflect.NativeConstructorAccessorImpl.newInstance0(Native Method)
	at sun.reflect.NativeConstructorAccessorImpl.newInstance(NativeConstructorAccessorImpl.java:57)

当若显式设置allowMultiQueries为true的话,就可以正常执行不会报错.如下所示:
String url = "jdbc:mysql://localhost:3306?allowMultiQueries=true";

官方文档解释:
allowMultiQueries
Allow the use of ';' to delimit multiple queries during one statement (true/false), defaults to 'false', and does not affect the addBatch() and executeBatch() methods, which instead rely on rewriteBatchStatements.
Default: false
Since version: 3.1.1

2、oracle版

 <!-- Oracle数据库批量保存: 
	 Oracle不支持values(),(),()
	 Oracle支持的批量方式
	 1、多个insert放在begin - end里面
	 	begin
		     insert into employees(employee_id,last_name,email) 
		     values(employees_seq.nextval,'test_001','[email protected]');
		     insert into employees(employee_id,last_name,email) 
		     values(employees_seq.nextval,'test_002','[email protected]');
		end;
	2、利用中间表:
		insert into employees(employee_id,last_name,email)
		   select employees_seq.nextval,lastName,email from(
		          select 'test_a_01' lastName,'test_a_e01' email from dual
		          union
		          select 'test_a_02' lastName,'test_a_e02' email from dual
		          union
		          select 'test_a_03' lastName,'test_a_e03' email from dual
		   )	
	 -->

实际写法:

<insert id="addEmps" databaseId="oracle">
	 <!-- oracle第一种批量方式 -->
	 <!-- <foreach collection="emps" item="emp" open="begin" close="end;">
	 	insert into employees(employee_id,last_name,email) 
		      values(employees_seq.nextval,#{emp.lastName},#{emp.email});
	 </foreach> -->
	 	
	 <!-- oracle第二种批量方式  -->
	 insert into employees(
	 	<!-- 引用外部定义的sql -->
	 	<include refid="insertColumn">
	 		<property name="testColomn" value="abc"/>
	 	</include>
	 )
	 		<foreach collection="emps" item="emp" separator="union"
	 			open="select employees_seq.nextval,lastName,email from("
	 			close=")">
	 			select #{emp.lastName} lastName,#{emp.email} email from dual
	 		</foreach>
 </insert>

特别提醒一下:下面的引用其实就是 待插入的 各个字段啦。

<!-- 引用外部定义的sql -->
	 <include refid="insertColumn">
	 	<property name="testColomn" value="abc"/>
	 </include>

用法说明:不是只能用在批量插入中,也可以用在其他数据操作中,因为只是对SQL片段的抽取。

 <!-- 
	  抽取可重用的sql片段。方便后面引用 
	  1、sql抽取:经常将要查询的列名,或者插入用的列名抽取出来方便引用
	  2、include来引用已经抽取的sql:
	  3、include还可以自定义一些property,sql标签内部就能使用自定义的属性
	  		include-property:取值的正确方式${prop},
	  		#{不能使用这种方式}
          4、employee_id,last_name,email,${prop} 这个oracle插入 其实等价于【当然数据库有没有相应字段是另一回事,在这里只是用来演示】 employee_id,last_name,email,abc
          5、_databaseId 是 mybatis 内置参数,和在 全局配置文件中,标记的数据库 名是 一样的
-->
  <sql id="insertColumn">
	  	<if test="_databaseId=='oracle'">
	  		employee_id,last_name,email,${prop}
	  	</if>
	  	<if test="_databaseId=='mysql'">
	  		last_name,email,gender,d_id
	  	</if>
 </sql>
 

mybatis动态sql-(5)-遍历查询foreach

一、编写接口方法:

package com.mybatis.mapper;

import java.util.List;
import org.apache.ibatis.annotations.Param;
import com.mybatis.bean.Employee;

public interface EmployeeMapperDynamicSQL {
	
	//查询员工id'在给定集合中的
	public List<Employee> getEmpsByConditionForeach(@Param("ids")List<Integer> ids);

}

 二、编写sql映射文件

<?xml version="1.0" encoding="UTF-8" ?>
<!DOCTYPE mapper
 PUBLIC "-//mybatis.org//DTD Mapper 3.0//EN"
 "http://mybatis.org/dtd/mybatis-3-mapper.dtd">
<mapper namespace="com.mybatis.mapper.EmployeeMapperDynamicSQL">

<!--public List<Employee> getEmpsByConditionForeach(List<Integer> ids);  -->
<select id="getEmpsByConditionForeach" resultType="com.mybatis.bean.Employee">
	 select * from tbl_employee
	 <!--
	 测试用例:
	 select * from tbl_employee where id in (1,2,3)
	 	
	 	collection:指定要遍历的集合:
	 		list类型的参数会特殊处理封装在map中,map的key就叫list
	 	item:将当前遍历出的元素赋值给指定的变量
	 	separator:每个元素之间的分隔符
	 	open:遍历出所有结果拼接一个开始的字符
	 	close:遍历出所有结果拼接一个结束的字符
	 	index:索引。遍历list的时候是index就是索引,item就是当前值
	 		   遍历map的时候index表示的就是map的key,item就是map的值
	 		
	 	#{变量名}就能取出变量的值也就是当前遍历出的元素
	  -->
	 <foreach collection="ids" item="item_id" separator=","
	 	open="where id in(" close=")">
	 	#{item_id}
	 </foreach>
</select>

</mapper>

 三、编写Junit测试

List<Employee> list = mapper.getEmpsByConditionForeach(Arrays.asList(1,2));
     for (Employee emp : list) {
	 System.out.println(emp);
}


mybatis动态sql-(4)-多次条件判断set和trim

当更新数据时,可以用 set 标签 来,来取消 更新语句中 多余的,
last_name=#{lastName}, 
比如上面这句话,如果是最后一个判断子句,那末尾的[,]是要去掉的,所以就需要用set标签了。trim标签之前提到过,功能很多,可以去头和去尾,也可以添加整句头和添加整句尾。

<!--public void updateEmp(Employee employee);  -->
<update id="updateEmp">
	 <!-- Set标签的使用 -->
	 update tbl_employee 
	<set>
		<if test="lastName!=null">
			last_name=#{lastName},
		</if>
		<if test="email!=null">
			email=#{email},
		</if>
		<if test="gender!=null">
			gender=#{gender}
		</if>
	</set>
	where id=#{id} 
<!-- 		
	Trim:更新拼串
	update tbl_employee 
	<trim prefix="set" suffixOverrides=",">
		<if test="lastName!=null">
			last_name=#{lastName},
		</if>
		<if test="email!=null">
			email=#{email},
		</if>
		<if test="gender!=null">
			gender=#{gender}
		</if>
	</trim>
	where id=#{id}  -->
 </update>


mybatis动态sql-(3)-单次条件判断choose

单次判断,就是只进行一次判断。

一、编辑接口文件

import java.util.List;
import org.apache.ibatis.annotations.Param;
import com.mybatis.bean.Employee;

public interface EmployeeMapperDynamicSQL {

       public List<Employee> getEmpsByConditionChoose(Employee employee);

}

二、编辑SQL映射文件

 <!-- public List<Employee> getEmpsByConditionChoose(Employee employee); -->
 <select id="getEmpsByConditionChoose" resultType="com.mybatis.bean.Employee">
	 select * from tbl_employee 
	 <where>
	 	<!-- 如果带了id就用id查,如果带了lastName就用lastName查;只会进入其中一个 -->
	 	<choose>
	 		<when test="id!=null">
	 			id=#{id}
	 		</when>
	 		<when test="lastName!=null">
	 			last_name like #{lastName}
	 		</when>
	 		<when test="email!=null">
	 			email = #{email}
	 		</when>
	 		<otherwise>
	 			gender = 0
	 		</otherwise>
	 	</choose>
	 </where>
 </select>

三、Junit单元测试

EmployeeMapperDynamicSQL mapper = openSession.getMapper(EmployeeMapperDynamicSQL.class);
Employee employee = new Employee(3,"%m%","[email protected]","2");

List<Employee> list = mapper.getEmpsByConditionChoose(employee);
	for(Employee emp :list){
	System.out.println(emp);
	System.out.println(emp.getDepartment());
}